<?xml version="1.0" encoding="utf-8"?>
<feed xmlns="http://www.w3.org/2005/Atom">

  <title><![CDATA[my failed projects]]></title>
  <link href="https://0x2c.org/atom.xml" rel="self"/>
  <link href="https://0x2c.org/"/>
  <updated>2016-01-10T17:33:43+01:00</updated>
  <id>https://0x2c.org/</id>
  <author>
    <name><![CDATA[]]></name>
    
  </author>
  <generator uri="http://octopress.org/">Octopress</generator>

  
  <entry>
    <title type="html"><![CDATA[Samsung SyncMaster 223BW Flicker / Bad Capacitor Fix]]></title>
    <link href="https://0x2c.org/samsung-syncmaster-223bw-flicker-slash-bad-capacitor-fix"/>
    <updated>2016-01-10T14:57:05+01:00</updated>
    <id>https://0x2c.org/samsung-syncmaster-223bw-flicker-slash-bad-capacitor-fix</id>
    <content type="html"><![CDATA[
<h2>Capacitors on the power supply board</h2>
<p>All electrolytic capacitors are by CapXon.  The capacitor specs come
  from <a href="http://capxon-europe.com/downloads/catalogue2014-2015.pdf">their catalogue</a>.  All capacitors have a lead spacing of 5mm.</p>
<table>
  <tr><th>count</th><th>value</th><th>voltage</th><th>type</th><th>size (d×h)</th><th>ripple I</th><th>impedance</th><th>replacement</th></tr>
  <tr><td>5</td><td>820µF</td><td>25V</td><td>CapXon GL</td><td>10mm×25mm</td><td>1460mA</td><td>43mΩ</td><td>EEUFR1E821B</td></tr>
  <tr><td>1</td><td>330µF</td><td>25V</td><td>CapXon GL</td><td>10mm×12.5mm</td><td>720mA</td><td>82mΩ</td><td>EEUFR1H331LB</td></tr>
  <tr><td>1</td><td>2.2µF</td><td>50V</td><td>CapXon GL</td><td>5mm×11mm</td><td>33mA</td><td>2.6Ω</td><td>EEUFC1H2R2</td></tr>
  <tr><td>1</td><td>47µF</td><td>50V</td><td>CapXon KM</td><td>6.3mm×11mm</td><td>115mA</td><td></td><td>EEUFR1H470</td></tr>
  <tr><td>1</td><td>22µF</td><td>50V</td><td>CapXon GL</td><td>6.3mm×11mm</td><td>135mA</td><td>1Ω</td><td>EEUFC1J220</td></tr>
</table>


]]></content>
  </entry>
  
  <entry>
    <title type="html"><![CDATA[Pulseaudio Equalizer]]></title>
    <link href="https://0x2c.org/pulseaudio-equalizer"/>
    <updated>2014-11-09T15:52:58+01:00</updated>
    <id>https://0x2c.org/pulseaudio-equalizer</id>
    <content type="html"><![CDATA[
<ul>
  <li><i>You have:</i> Pulseaudio, and an audio output device (sink).</li>
  <li><i>You want:</i> Change the frequency response of exactly this audio
    output device.</li>
</ul>
<!-- more -->
<h2>Equalizer curve</h2>
<p>Use <code>qpaep</code> to adjust the equalizer curve.</p>
<h2>Pulseaudio setup</h2>
<p>By default, the Pulseaudio equalizer will only attach to the default
  sink.  If you want the equalizer on a specific sink, add an equalizer
  module using:</p>
<div class="highlight"><pre>pactl load-module module-equalizer-sink sink_master=$SINK
</pre></div>
<p>where <code>$SINK</code> is the sink name obtained from <code>pactl list sinks</code>.</p>


]]></content>
  </entry>
  
  <entry>
    <title type="html"><![CDATA[ICC Profiles for Lenovo X220 IPS and Philips 273E3]]></title>
    <link href="https://0x2c.org/icc_profiles_for_lenovo_x220_ips_and_philips_273e3"/>
    <updated>2013-07-22T17:42:02+02:00</updated>
    <id>https://0x2c.org/icc_profiles_for_lenovo_x220_ips_and_philips_273e3</id>
    <content type="html"><![CDATA[
<ul>
  <li><i>You have:</i> A Lenovo X220 IPS or Philips 273E screen</li>
  <li><i>You want:</i> Correct colors on said screens</li>
</ul>
<!-- more -->
<p>I recently received a <a href="http://hughski.com/">ColorHUG</a> and calibrated my screens.  For your
  convenience:</p>
<ul>
  <li><a href="https://0x2c.org/files/Lenovo-4286CTO.icc">ICC profile for Lenovo X220 IPS</a></li>
  <li><a href="https://0x2c.org/files/Philips-273ELH.icc">ICC profile for Philips 273E</a></li>
</ul>


]]></content>
  </entry>
  
  <entry>
    <title type="html"><![CDATA[Nice URLs for CGIs With Lighttpd]]></title>
    <link href="https://0x2c.org/nice_urls_for_cgis_with_lighttpd"/>
    <updated>2012-10-19T23:03:52+02:00</updated>
    <id>https://0x2c.org/nice_urls_for_cgis_with_lighttpd</id>
    <content type="html"><![CDATA[<ul>
<li><em>You have:</em> lighttpd and some CGI <em>/path/to/foo.sh</em></li>
<li><em>You want:</em> Execute the CGI under a nice URL, possibly with path
 arguments <em>/myfoo/&hellip;</em>; maybe serve a static page at the CGI root
 <em>/myfoo/</em></li>
</ul>


<!-- more -->


<h2>lighttpd setup</h2>

<p>Load <code>mod_alias</code> and <code>mod_cgi</code>:</p>

<figure class='code'><div class="highlight"><table><tr><td class="gutter"><pre class="line-numbers"><span class='line-number'>1</span>
</pre></td><td class='code'><pre><code class=''><span class='line'>server.modules += ( "mod_alias", "mod_cgi")</span></code></pre></td></tr></table></div></figure>


<p>Set up CGI execution for under <code>/myfoo/</code>:</p>

<figure class='code'><div class="highlight"><table><tr><td class="gutter"><pre class="line-numbers"><span class='line-number'>1</span>
<span class='line-number'>2</span>
<span class='line-number'>3</span>
<span class='line-number'>4</span>
</pre></td><td class='code'><pre><code class=''><span class='line'>$HTTP["url"] =~ "^/myfoo/" {
</span><span class='line'>  alias.url += ( "/myfoo" =&gt; "/path/to/foo.sh" )
</span><span class='line'>  cgi.assign += ( "/path/to/foo.sh" =&gt; "" )
</span><span class='line'>}</span></code></pre></td></tr></table></div></figure>


<p>This will run <code>/path/to/foo.sh</code> as CGI for every access to <code>/myfoo</code>
and below.  For example, an access to <code>/myfoo/bar/z</code> will run
<code>/path/to/foo.sh</code> with the environment variable <code>PATH_INFO</code> set to
<code>/bar/z</code>.</p>

<h3>Optional serving of index in the CGI root</h3>

<p>If you want the CGI to only be executed below <code>/myfoo/</code>, and have an
index page <code>/path/of/index.html</code> served for <code>/myfoo</code>, modify the setup
to match <code>^/myfoo/.</code> instead of <code>^/myfoo/</code>, and add an alias to the
directory of the index:</p>

<figure class='code'><div class="highlight"><table><tr><td class="gutter"><pre class="line-numbers"><span class='line-number'>1</span>
<span class='line-number'>2</span>
<span class='line-number'>3</span>
<span class='line-number'>4</span>
</pre></td><td class='code'><pre><code class=''><span class='line'>$HTTP["url"] =~ "^/myfoo/." {
</span><span class='line'>...
</span><span class='line'>}
</span><span class='line'>alias.url += ( "/myfoo" =&gt; "/path/of" )</span></code></pre></td></tr></table></div></figure>

]]></content>
  </entry>
  
  <entry>
    <title type="html"><![CDATA[RFC2136 DDNS, BIND & DNSSEC for Home Router Dynamic DNS]]></title>
    <link href="https://0x2c.org/rfc2136-ddns-bind-dnssec-for-home-router-dynamic-dns"/>
    <updated>2012-09-28T13:39:42+02:00</updated>
    <id>https://0x2c.org/rfc2136-ddns-bind-dnssec-for-home-router-dynamic-dns</id>
    <content type="html"><![CDATA[<ul>
<li><em>You have:</em> a BIND that already does DNSSEC; a home router</li>
<li><em>You want:</em> a hostname <em>myhost</em> in your domain <em>example.org</em> that tracks your home router&rsquo;s IP</li>
</ul>


<!-- more -->


<h2>BIND setup</h2>

<p>The
<a href="https://six53.net/media/DNSSEC-refcard-a5.pdf">six53 DNSSEC reference card</a>
has been very helpful.  A
<a href="http://www.netlinxinc.com/netlinx-blog/45-dns/133-bind-970-part-4-automatic-zone-signing.html">Netlink article</a>
covers some of the content as well.  IPAM
<a href="http://ipamworldwide.com/bind-options/update-policy-option.html">explains</a>
the update-policy options.</p>

<p>Generate asymmetric DNSSEC key for <code>nsupdate</code> on <em>myhost</em>:</p>

<figure class='code'><div class="highlight"><table><tr><td class="gutter"><pre class="line-numbers"><span class='line-number'>1</span>
</pre></td><td class='code'><pre><code class=''><span class='line'>dnssec-keygen -C -r /dev/urandom -a RSASHA256 -b 2048 -n HOST -T KEY myhost.example.org</span></code></pre></td></tr></table></div></figure>


<p>This will generate two files, <code>Kmyhost.example.org.*.{key,private}</code>.
Copy both files to <em>myhost</em>.</p>

<p>Add the host key to the zone file <code>db.example.org</code>:</p>

<figure class='code'><div class="highlight"><table><tr><td class="gutter"><pre class="line-numbers"><span class='line-number'>1</span>
</pre></td><td class='code'><pre><code class=''><span class='line'>$include "/path/of/Kmyhost.example.org.*.key"</span></code></pre></td></tr></table></div></figure>


<p>This will add a <code>KEY</code> resource record (RR) for <code>myhost.example.org</code>.  In
the next step we will refer to this key.</p>

<p>Set up BIND for automatic zone signing:</p>

<figure class='code'><div class="highlight"><table><tr><td class="gutter"><pre class="line-numbers"><span class='line-number'>1</span>
<span class='line-number'>2</span>
<span class='line-number'>3</span>
<span class='line-number'>4</span>
<span class='line-number'>5</span>
<span class='line-number'>6</span>
<span class='line-number'>7</span>
<span class='line-number'>8</span>
<span class='line-number'>9</span>
<span class='line-number'>10</span>
<span class='line-number'>11</span>
</pre></td><td class='code'><pre><code class=''><span class='line'>zone "example.org" {
</span><span class='line'>        type master;
</span><span class='line'>        key-directory "/etc/bind";
</span><span class='line'>        auto-dnssec maintain;
</span><span class='line'>        sig-validity-interval 30;       // days
</span><span class='line'>        update-policy {
</span><span class='line'>                grant local-ddns zonesub ANY;
</span><span class='line'>                grant myhost.example.org. self dummy A AAAA TXT SSHFP;
</span><span class='line'>        };
</span><span class='line'>        file "/etc/bind/db.example.org";
</span><span class='line'>};</span></code></pre></td></tr></table></div></figure>


<p>This configures BIND to accept dynamic updates of the zone and
automatically keeps the zone signed.  It also allows updates to
<code>myhost.example.org</code>&rsquo;s <code>A</code>, <code>AAAA</code>, <code>TXT</code>, and <code>SSHFP</code> RRs, as long as
the updater is in possession of the private key matching the <code>KEY</code> RR
of <code>myhost.example.org</code>.</p>

<p>Make sure that BIND can write to the directory the zone file is in,
because it will create a journal and also update the zone file itself.</p>

<p>Now reload the BIND config with <code>rndc reload</code>.  Check for error
messages in <code>/var/log/messages</code>.</p>

<h2>Home router setup</h2>

<p>Put the generated key files from above in a convenient location,
e.g. <code>/etc/ddns</code>.  The following shell script can then be used from
various hooks, e.g. <code>/etc/ddns/ddns-update.sh A 172.17.1.2</code></p>

<figure class='code'><figcaption><span></span></figcaption><div class="highlight"><table><tr><td class="gutter"><pre class="line-numbers"><span class='line-number'>1</span>
<span class='line-number'>2</span>
<span class='line-number'>3</span>
<span class='line-number'>4</span>
<span class='line-number'>5</span>
<span class='line-number'>6</span>
<span class='line-number'>7</span>
<span class='line-number'>8</span>
<span class='line-number'>9</span>
<span class='line-number'>10</span>
<span class='line-number'>11</span>
</pre></td><td class='code'><pre><code class='sh'><span class='line'><span class="c">#!/bin/sh</span>
</span><span class='line'>
</span><span class='line'><span class="nv">HOST</span><span class="o">=</span>myhost.example.org
</span><span class='line'><span class="nv">CONFDIR</span><span class="o">=</span><span class="k">$(</span>dirname <span class="s2">&quot;$0&quot;</span><span class="k">)</span>
</span><span class='line'>
</span><span class='line'><span class="nb">exec </span>nsupdate -k <span class="nv">$CONFDIR</span>/K<span class="nv">$HOST</span>*.private -- - <span class="s">&lt;&lt;__END__</span>
</span><span class='line'><span class="s">update delete $HOST $1</span>
</span><span class='line'><span class="s">update add $HOST ${TTL:-300} $@</span>
</span><span class='line'><span class="s">show</span>
</span><span class='line'><span class="s">send</span>
</span><span class='line'><span class="s">__END__</span>
</span></code></pre></td></tr></table></div></figure>


<p>Hook the update script into ppp by creating the following shell script
as <code>/etc/ppp/ip-up.d/ddns</code>.  Remember to <code>+x</code> all scripts.</p>

<figure class='code'><figcaption><span></span></figcaption><div class="highlight"><table><tr><td class="gutter"><pre class="line-numbers"><span class='line-number'>1</span>
<span class='line-number'>2</span>
<span class='line-number'>3</span>
<span class='line-number'>4</span>
<span class='line-number'>5</span>
</pre></td><td class='code'><pre><code class='sh'><span class='line'><span class="c">#!/bin/sh</span>
</span><span class='line'>
</span><span class='line'><span class="c"># IPv4 update script for RFC2136 DDNS</span>
</span><span class='line'>
</span><span class='line'>/etc/ddns/ddns-update.sh A <span class="nv">$PPP_LOCAL</span>
</span></code></pre></td></tr></table></div></figure>


<p>If an IPv6 network is announced to the home network, hook it in
dhcp6c&rsquo;s <code>/etc/wide-dhcpv6/dhcp6c.conf</code>:</p>

<figure class='code'><figcaption><span></span></figcaption><div class="highlight"><table><tr><td class="gutter"><pre class="line-numbers"><span class='line-number'>1</span>
<span class='line-number'>2</span>
<span class='line-number'>3</span>
<span class='line-number'>4</span>
<span class='line-number'>5</span>
</pre></td><td class='code'><pre><code class='sh'><span class='line'>profile default
</span><span class='line'><span class="o">{</span>
</span><span class='line'>...
</span><span class='line'>        script <span class="s2">&quot;/etc/wide-dhcpv6/update-ipv6.sh&quot;</span><span class="p">;</span>
</span><span class='line'><span class="o">}</span><span class="p">;</span>
</span></code></pre></td></tr></table></div></figure>


<p>Update the IP from <code>/etc/wide-dhcpv6/update-ipv6.sh</code> for the network
on <code>MYIFACE</code>:</p>

<figure class='code'><figcaption><span></span></figcaption><div class="highlight"><table><tr><td class="gutter"><pre class="line-numbers"><span class='line-number'>1</span>
<span class='line-number'>2</span>
<span class='line-number'>3</span>
<span class='line-number'>4</span>
<span class='line-number'>5</span>
<span class='line-number'>6</span>
</pre></td><td class='code'><pre><code class='sh'><span class='line'><span class="nv">MYIFACE</span><span class="o">=</span>br0
</span><span class='line'><span class="o">(</span>
</span><span class='line'>sleep 2
</span><span class='line'><span class="nv">myipv6</span><span class="o">=</span><span class="k">$(</span>ip addr show dev <span class="nv">$MYIFACE</span> <span class="p">|</span> sed -ne<span class="s1">&#39;s/^.*inet6 \([^ ]*\)\/.*$/\1/;T;p;q;&#39;</span><span class="k">)</span>
</span><span class='line'>/etc/ddns/ddns-update.sh AAAA <span class="nv">$myipv6</span>
</span><span class='line'><span class="o">)</span> <span class="p">&amp;</span>
</span></code></pre></td></tr></table></div></figure>


<p>Regexp courtesy of <a href="http://superuser.com/questions/389766/linux-bash-how-to-get-interfaces-ipv6-address">SuperUser</a>.</p>
]]></content>
  </entry>
  
  <entry>
    <title type="html"><![CDATA[Wireless Speakers]]></title>
    <link href="https://0x2c.org/wireless-speakers"/>
    <updated>2011-07-01T00:00:00+02:00</updated>
    <id>https://0x2c.org/wireless-speakers</id>
    <content type="html"><![CDATA[<ul>
<li><em>You have:</em> A stereo, another room without said stereo</li>
<li><em>You want:</em> Speakers in said other room playing the same content
 that is playing on the stereo</li>
</ul>


<!-- more -->


<h2>Overview</h2>

<p>I bought a set of
<a href="http://www.amazon.de/SilverCrest-RFH1863-Stereo-Funkkopfh%C3%B6re-Aufladbare-Docking-Station/dp/B003YM610Y">wireless headphones</a>
for very cheap (&lt; €5) off eBay.  I use a
<a href="http://www.sureelectronics.net/goods.php?id=12">2x 15W amplifier board</a>
to hook up a spare set of
<a href="http://www.jblpro.com/pub/obsolete/Control_1c.pdf">JBL Control 1C</a>.
The amplifier is powered by a
<a href="http://cgi.ebay.com/ws/eBayISAPI.dll?ViewItem&amp;item=390220960306">12V 3A power supply off eBay</a>.
The volume control and tone adjustments are handled by a
<a href="http://www.st.com/internet/com/TECHNICAL_RESOURCES/TECHNICAL_LITERATURE/DATASHEET/CD00004906.pdf">TDA7439</a>
4 stereo input sound processor IC.  The resulting product should go in
a case and offer some controls, such as volume, equalizer, and mute.</p>

<h3>Receiver</h3>

<p>The wireless headphone set was a great deal.  It comes with a 5V wall
wart PSU, a transmitter, a Li-Ion battery, two speakers and a receiver
unit.</p>

<p>Luckily the extraction of the remote receiver (RX) circuit was even
easier than I had hoped for—the RX is socked on a daughter board:</p>

<p><img src="https://0x2c.org/images/wireless-speaker/rxboard-socketed.jpg" alt="" /></p>

<p>The receiver board contains a presumably custom IC labeled
<q>W001RX</q> and a set of other ICs I cannot identify.
Reverse engineering the rxboard signals gives this pinout:</p>

<p><img src="https://0x2c.org/images/wireless-speaker/rxboard-pins.jpg" alt="" /></p>

<ol>
<li>right audio <strong>out</strong></li>
<li>left audio <strong>out</strong></li>
<li>Vcc 3.17V <strong>in</strong></li>
<li>unknown</li>
<li>/SCAN <strong>in</strong></li>
<li>/TUNED <strong>out</strong></li>
<li>GND</li>
<li>antenna GND</li>
<li>antenna</li>
</ol>


<p>The audio lines carry an AC signal with the amplitude depending on the
amplitude going into the TX circuit.  My portable audio player
produced a 150mV p-p signal, and the PC line out produced a 1V p-p
signal.</p>

<p>/SCAN is kept low in operation; a positive edge makes the circuit jump
to the next channel.  There are 3 channels supported, and it defaults
to a fixed channel on power on.  If you want to select a specific
channel, you&rsquo;ll have to hop to it by triggering /SCAN once or twice.</p>

<p>/TUNED is pulled low by the circuit if it detects a carrier, otherwise
it is high.</p>

<p>The antenna is roughly 83mm in length (λ/4).</p>

<h3>Circuit</h3>

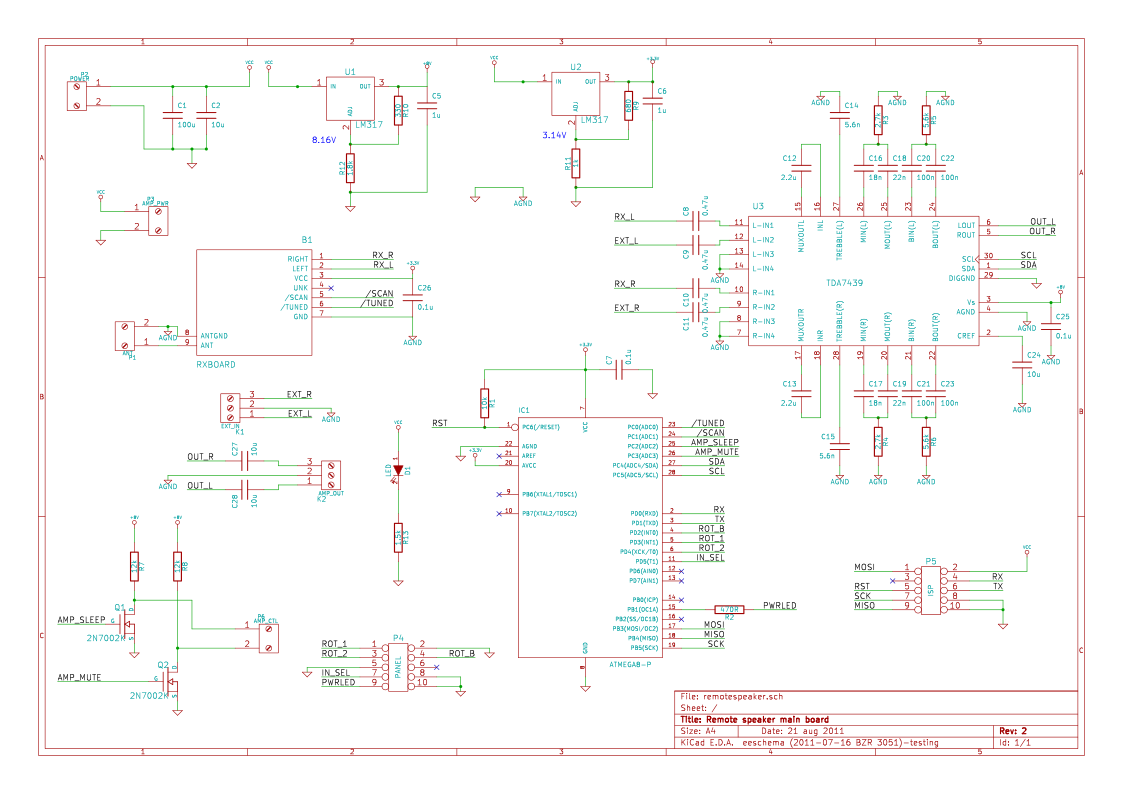
<p>All files in KiCAD format are available from a
<a href="https://gitorious.org/wireless-speaker/board/trees/master">Gitorious repo</a>.</p>

<p><a href="https://0x2c.org/images/wireless-speaker/remotespeaker.svgz"><img src="https://0x2c.org/images/wireless-speaker/remotespeaker.svgz" alt="" /></a></p>

<h4>Power</h4>

<p>The circuit hosts power input, power out for the amplifier, and a set
of honky capacitors to reduce switching noise from the PSU and
amplifier.  Two voltage regulators produce 8V for the audio processor
and 3.3V for the rest of the system.</p>

<h4>Micro controller</h4>

<p>An
<a href="http://www.atmel.com/dyn/resources/prod_documents/doc2486.pdf">ATMEGA8</a>
is used for user input and control.  As far as I can tell an
<a href="http://www.atmel.com/dyn/resources/prod_documents/doc2545.pdf">ATMEGA48</a>
or related could be used instead.</p>

<p>The input to the system are a
<a href="http://www.sureelectronics.net/goods.php?id=221">rotary encoder</a> for
volume and tone and an on-off switch for sound source selection.  One
line of the rotary encoder is wired up to an interrupt pin on the µC,
as is the push button of the rotary encoder.  The on-off switch is
polled.  A power LED can give some visual feedback on the state of the
controls.  The LED is hooked up to a timer/PWM output pin so that the
brightness of the LED can be modified easily to convey more
information.</p>

<p>A 10-pin IPS (In System Programming) header allows for firmware
upgrades for the Atmel µC.</p>

<h4>Audio</h4>

<p>Inputs come from the receiver board and from an optional external
input such as a mobile audio player.  The central part of the circuit
is the TDA7439 with 4 stereo inputs and tone control.  The µC connects
to the audio processor via I²C bus and controls input channels and
tone/volume settings.  The TDA7439 requires a fair amount of discrete
components for tone control, and I simply used the values of the
datasheet’s test (and only) circuit.  I added an AC coupling capacitor
to the outputs to remove the 4V DC offset.</p>

<h3>Board</h3>

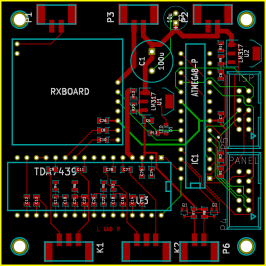
<p><a href="https://0x2c.org/images/wireless-speaker/remotespeaker-brd.svgz"><img src="https://0x2c.org/images/wireless-speaker/remotespeaker-brd.svgz" alt="" /></a></p>

<p>The TDA7439 comes in a SDIP30 package, for which it is virtually
impossible to obtain a socket.  Therefore I designed a breakout board
from SDIP32 to DIP32-600, and the main board uses a DIP32-600 socket.
Most board inputs are screw terminals, except for the panel and ISP
connectors which are male IDC headers.</p>

<p>The audio part (left) and the digital part (right) have their own
2-sided flood-filled ground planes.  Both sides are only connected on
one spot to minimize digital noise coupling.  In the end I did not
connect front and back planes with additional vias, but the existing
through-hole ground connections should be enough.  The ground zones
are not shown in the board layout to improve clarity.</p>

<p>The board shown here is revision 2, using SMT components.</p>

<h2>Real hardware</h2>

<h3>Interfacing with the TDA7439</h3>

<p>With the first board back from the fab, I put on all components
except for the AVR and the wireless module in order to check for
design problems.  I hooked up my
<a href="http://dangerousprototypes.com/docs/Bus_Pirate">Bus Pirate</a> to the
I2C bus via the AVR socket:</p>

<p><img src="https://0x2c.org/images/wireless-speaker/board-buspirate.jpg" alt="" /></p>

<p>We initialize the TDA7439 to produce some output signal using the bus pirate:</p>

<pre><code>% screen /dev/ttyUSB1 115200

HiZ&gt;m
1. HiZ
2. 1-WIRE
3. UART
4. I2C
5. SPI
6. 2WIRE
7. 3WIRE
8. LCD
9. DIO
x. exit(without change)

(1)&gt;4
Set speed:
 1. ~5KHz
 2. ~50KHz
 3. ~100KHz
 4. ~400KHz

(1)&gt;4
Ready
I2C&gt;W
Power supplies ON
I2C&gt;P
Pull-up resistors ON
I2C&gt;(1)
Searching I2C address space. Found devices at:
0x88(0x44 W) 0x89(0x44 R) 

I2C&gt;[0x88 0x10 2 10 0 7 7 7 0 0] 
I2C START BIT
WRITE: 0x88 ACK 
WRITE: 0x10 ACK 
WRITE: 0x02 ACK 
WRITE: 0x0A ACK 
WRITE: 0x00 ACK 
WRITE: 0x07 ACK 
WRITE: 0x07 ACK 
WRITE: 0x07 ACK 
WRITE: 0x00 ACK 
WRITE: 0x00 ACK 
I2C STOP BIT
I2C&gt;
</code></pre>

<p>The I2C sequence breaks down to:</p>

<ul>
<li><strong>0x88</strong> TDA chip address</li>
<li><strong>0x10</strong> use address incrementing (bit 4), write address 0 (bits 3-0)</li>
<li><strong>2</strong> input channel 2 (the external input)</li>
<li><strong>10</strong> 20dB input gain</li>
<li><strong>0</strong> 0dB volume</li>
<li><strong>7</strong> 0dB bass gain</li>
<li><strong>7</strong> 0dB mi-range gain</li>
<li><strong>7</strong> 0dB treble gain</li>
<li><strong>0</strong> 0dB right speaker attenuation</li>
<li><strong>0</strong> 0dB left speaker attenuation</li>
</ul>


<p>Now the output comes to life:</p>

<p><img src="https://0x2c.org/images/wireless-speaker/tda-working-scope.jpg" alt="" /></p>

<p>The blue channel 2 shows the input from the music player, the yellow
channel 1 shows the output from the TDA; both are scoped AC-coupled
because there is a serious DC offset on both signals.  You can see
that the output sort of matches the input signal: the scale of the
input channel is 500mV/div, the scale of the output channel is 2V/div;
the output seems about double the amplitude for small signals, so
we&rsquo;re probably running with a 10dB amplification.</p>

<p>Because I didn&rsquo;t have sufficiently large DC blocking ceramic or film
capacitors, the signal is a bit distorted; slopes do not match
properly, and sometimes you can see a phase offset.  I have the
impression that the input trails the output at times, but that of
course doesn&rsquo;t make any sense.</p>

<h3>Amplifier board</h3>

<h4>Audio in</h4>

<p>The
<a href="http://www.sure-electronics.net/download/AA-AB32155_SCH.pdf">schematic</a>
of the amplifier shows that on the input line are a 0.1µF cap to
ground; then a 10µF cap and a 20k resistor in series (plus some
biasing circuitry) go into the amplifier chip.</p>

<h4>Signal lines: SLEEP and MUTE</h4>

<p>The amplifier chip is a
<a href="http://www.datasheetcatalog.org/datasheet/Tripath/mXyzxwwt.pdf">TA2024</a>
class D amplifier.  It requires between 3.5V and 5V input for a logic
high for the SLEEP and MUTE lines.  However, the AVR on my receiver board circuit
runs at 3.3V, with 8V available for the TDA7439.</p>

<p>Looking at the schematic, the MUTE board input forms a 20k/20k voltage
divider to ground; the SLEEP input to the board goes directly to the
sleep pin of the TA2024, with a 20k resistor to ground.  I will remove
the input resistor for MUTE, so that both SLEEP and MUTE are
conditioned the same way.  On the controller board, one 12k resistor
per signal forms a voltage divider from 8V to 5V, and each a N-channel
MOSFET lets the µC to pull this signal to GND.</p>
]]></content>
  </entry>
  
  <entry>
    <title type="html"><![CDATA[How to Serve ~user UserDirs for Git With Apache]]></title>
    <link href="https://0x2c.org/how-to-serve-userdirs-for-git-with-apache"/>
    <updated>2009-01-10T15:48:34+01:00</updated>
    <id>https://0x2c.org/how-to-serve-userdirs-for-git-with-apache</id>
    <content type="html"><![CDATA[<ul>
<li><em>You have:</em> Apache httpd, gitweb, git repos in users&#8217; homes
 <em>~user/git/*</em></li>
<li><em>You want:</em> serve these repos under
 *<a href="http://gitweb.example.org/~user/...*">http://gitweb.example.org/~user/&#8230;*</a></li>
</ul>


<!-- more -->


<p>By default, gitweb only supports serving repos from one project root.  For
<a href="http://www.dragonflybsd.org">DragonFly</a> we wanted not only to
serve the main project repo in <a href="http://gitweb.dragonflybsd.org">gitweb</a>, but also serve the
personal repos of developers.  These repos are located in the users’ home
directory in <code>~user/git</code>.  Turns out I could make this work without
having to modify the gitweb source.  By adding the following fragment to
gitweb’s config file <code>/etc/gitweb.conf</code>, we can now serve the
users’ <a href="http://gitweb.dragonflybsd.org/~corecode">personal repos</a>:</p>

<figure class='code'><figcaption><span></span></figcaption><div class="highlight"><table><tr><td class="gutter"><pre class="line-numbers"><span class='line-number'>1</span>
<span class='line-number'>2</span>
<span class='line-number'>3</span>
<span class='line-number'>4</span>
<span class='line-number'>5</span>
<span class='line-number'>6</span>
<span class='line-number'>7</span>
<span class='line-number'>8</span>
<span class='line-number'>9</span>
<span class='line-number'>10</span>
<span class='line-number'>11</span>
<span class='line-number'>12</span>
<span class='line-number'>13</span>
<span class='line-number'>14</span>
<span class='line-number'>15</span>
<span class='line-number'>16</span>
<span class='line-number'>17</span>
<span class='line-number'>18</span>
<span class='line-number'>19</span>
<span class='line-number'>20</span>
</pre></td><td class='code'><pre><code class='perl'><span class='line'><span class="c1"># Support for ~user git repo serving</span>
</span><span class='line'>
</span><span class='line'><span class="c1"># Does the url path start with /~user ?</span>
</span><span class='line'><span class="k">if</span> <span class="p">(</span><span class="nv">$ENV</span><span class="p">{</span><span class="s">&quot;PATH_INFO&quot;</span><span class="p">}</span> <span class="o">=~</span> <span class="n">m</span><span class="c1">#^/~([^/]+)#) {</span>
</span><span class='line'>  <span class="k">my</span> <span class="nv">$username</span> <span class="o">=</span> <span class="nv">$1</span><span class="p">;</span>
</span><span class='line'>
</span><span class='line'>  <span class="c1"># check whether the user really exists</span>
</span><span class='line'>  <span class="k">my</span> <span class="nv">@pwent</span> <span class="o">=</span> <span class="nb">getpwnam</span><span class="p">(</span><span class="nv">$username</span><span class="p">);</span>
</span><span class='line'>  <span class="k">if</span> <span class="p">(</span><span class="nv">@pwent</span><span class="p">)</span> <span class="p">{</span>
</span><span class='line'>      <span class="c1"># we only serve $HOME/git/</span>
</span><span class='line'>      <span class="nv">$projectroot</span> <span class="o">=</span> <span class="nv">$pwent</span><span class="p">[</span><span class="mi">7</span><span class="p">]</span> <span class="o">.</span> <span class="s">&quot;/git&quot;</span><span class="p">;</span>
</span><span class='line'>
</span><span class='line'>      <span class="c1"># Fix up git&#39;s idea of the urls :/</span>
</span><span class='line'>      <span class="nv">$my_url</span> <span class="o">.=</span> <span class="s">&quot;/~$username&quot;</span><span class="p">;</span>
</span><span class='line'>      <span class="nv">$my_uri</span> <span class="o">.=</span> <span class="s">&quot;/~$username&quot;</span><span class="p">;</span>
</span><span class='line'>      <span class="nv">$home_link</span> <span class="o">.=</span> <span class="s">&quot;~$username&quot;</span><span class="p">;</span>
</span><span class='line'>      <span class="nv">$home_link_str</span> <span class="o">=</span> <span class="nv">$username</span><span class="o">.</span><span class="s">&quot;&#39;s projects&quot;</span><span class="p">;</span>
</span><span class='line'>      <span class="nv">$path_info</span> <span class="o">=~</span> <span class="n">s</span><span class="c1">#^/~[^/]+##;</span>
</span><span class='line'>  <span class="p">}</span>
</span><span class='line'><span class="p">}</span>
</span></code></pre></td></tr></table></div></figure>

]]></content>
  </entry>
  
</feed>